
万相图像编辑模型系列支持多图输入与多图输出,通过文本指令实现图像编辑、多图融合、主体特征保持、目标检测与分割等能力。
快速开始
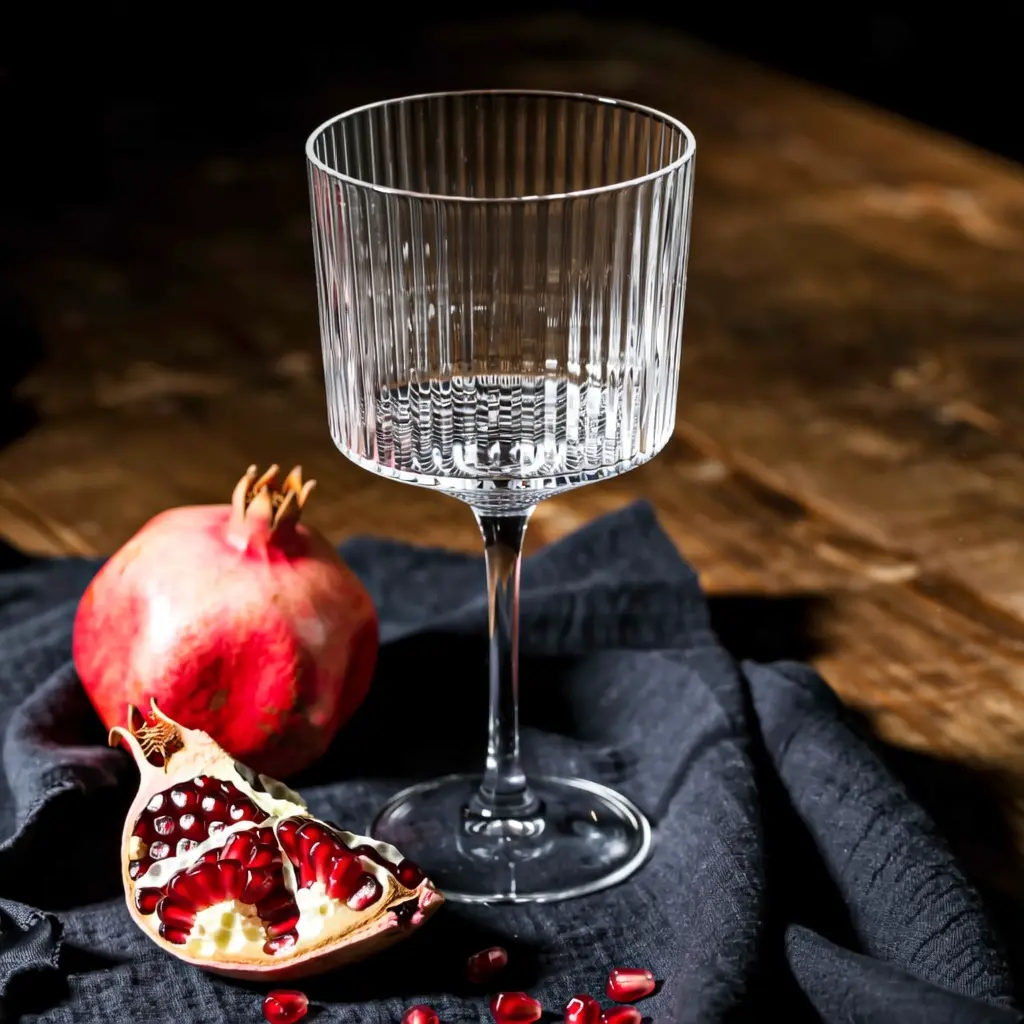
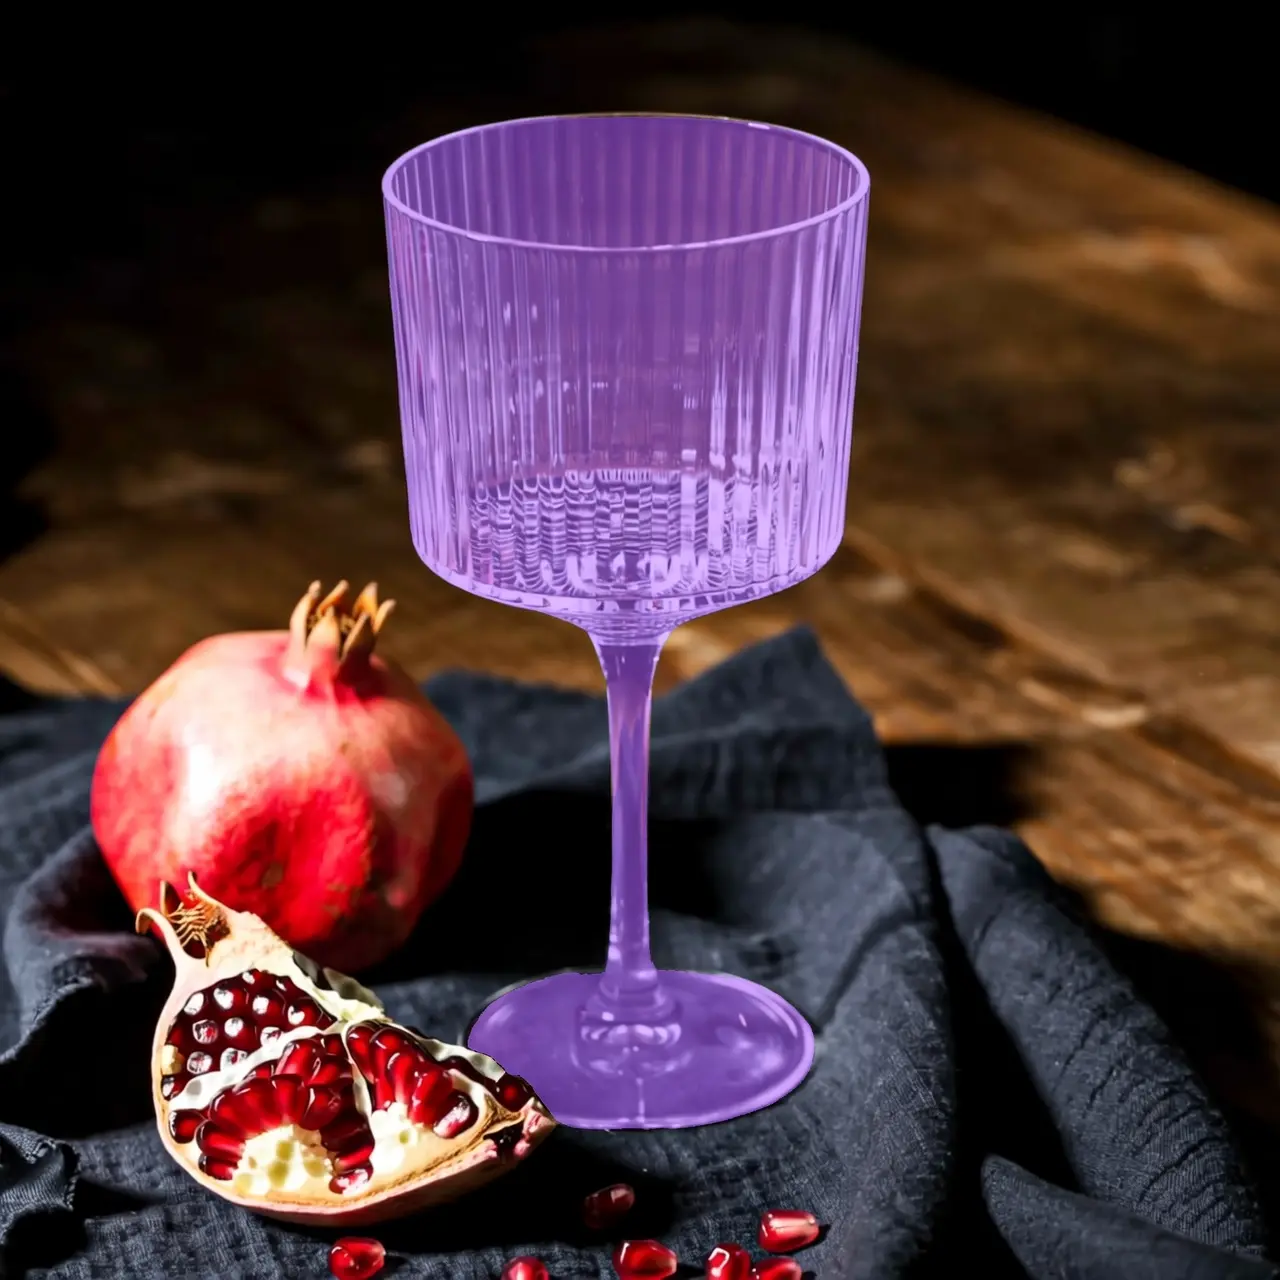
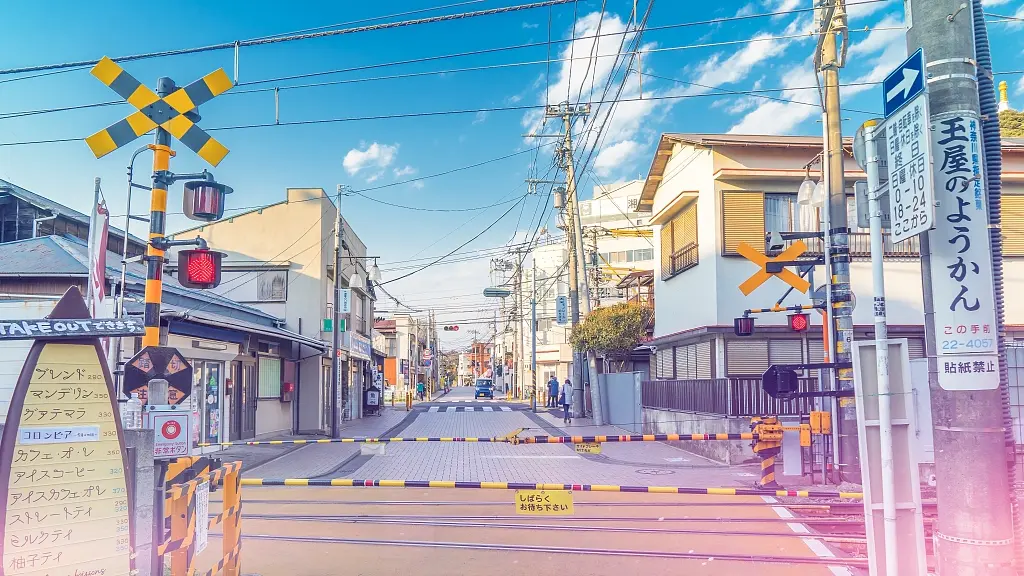
本示例将演示如何使用wan2.7-image-pro模型,基于2张输入图片和提示词生成编辑后的图像。
提示词:把图2的涂鸦喷绘在图1的汽车上
| 输入图像1 | 输入图像2 | 输出图像(wan2.7-image-pro) |
|---|---|---|
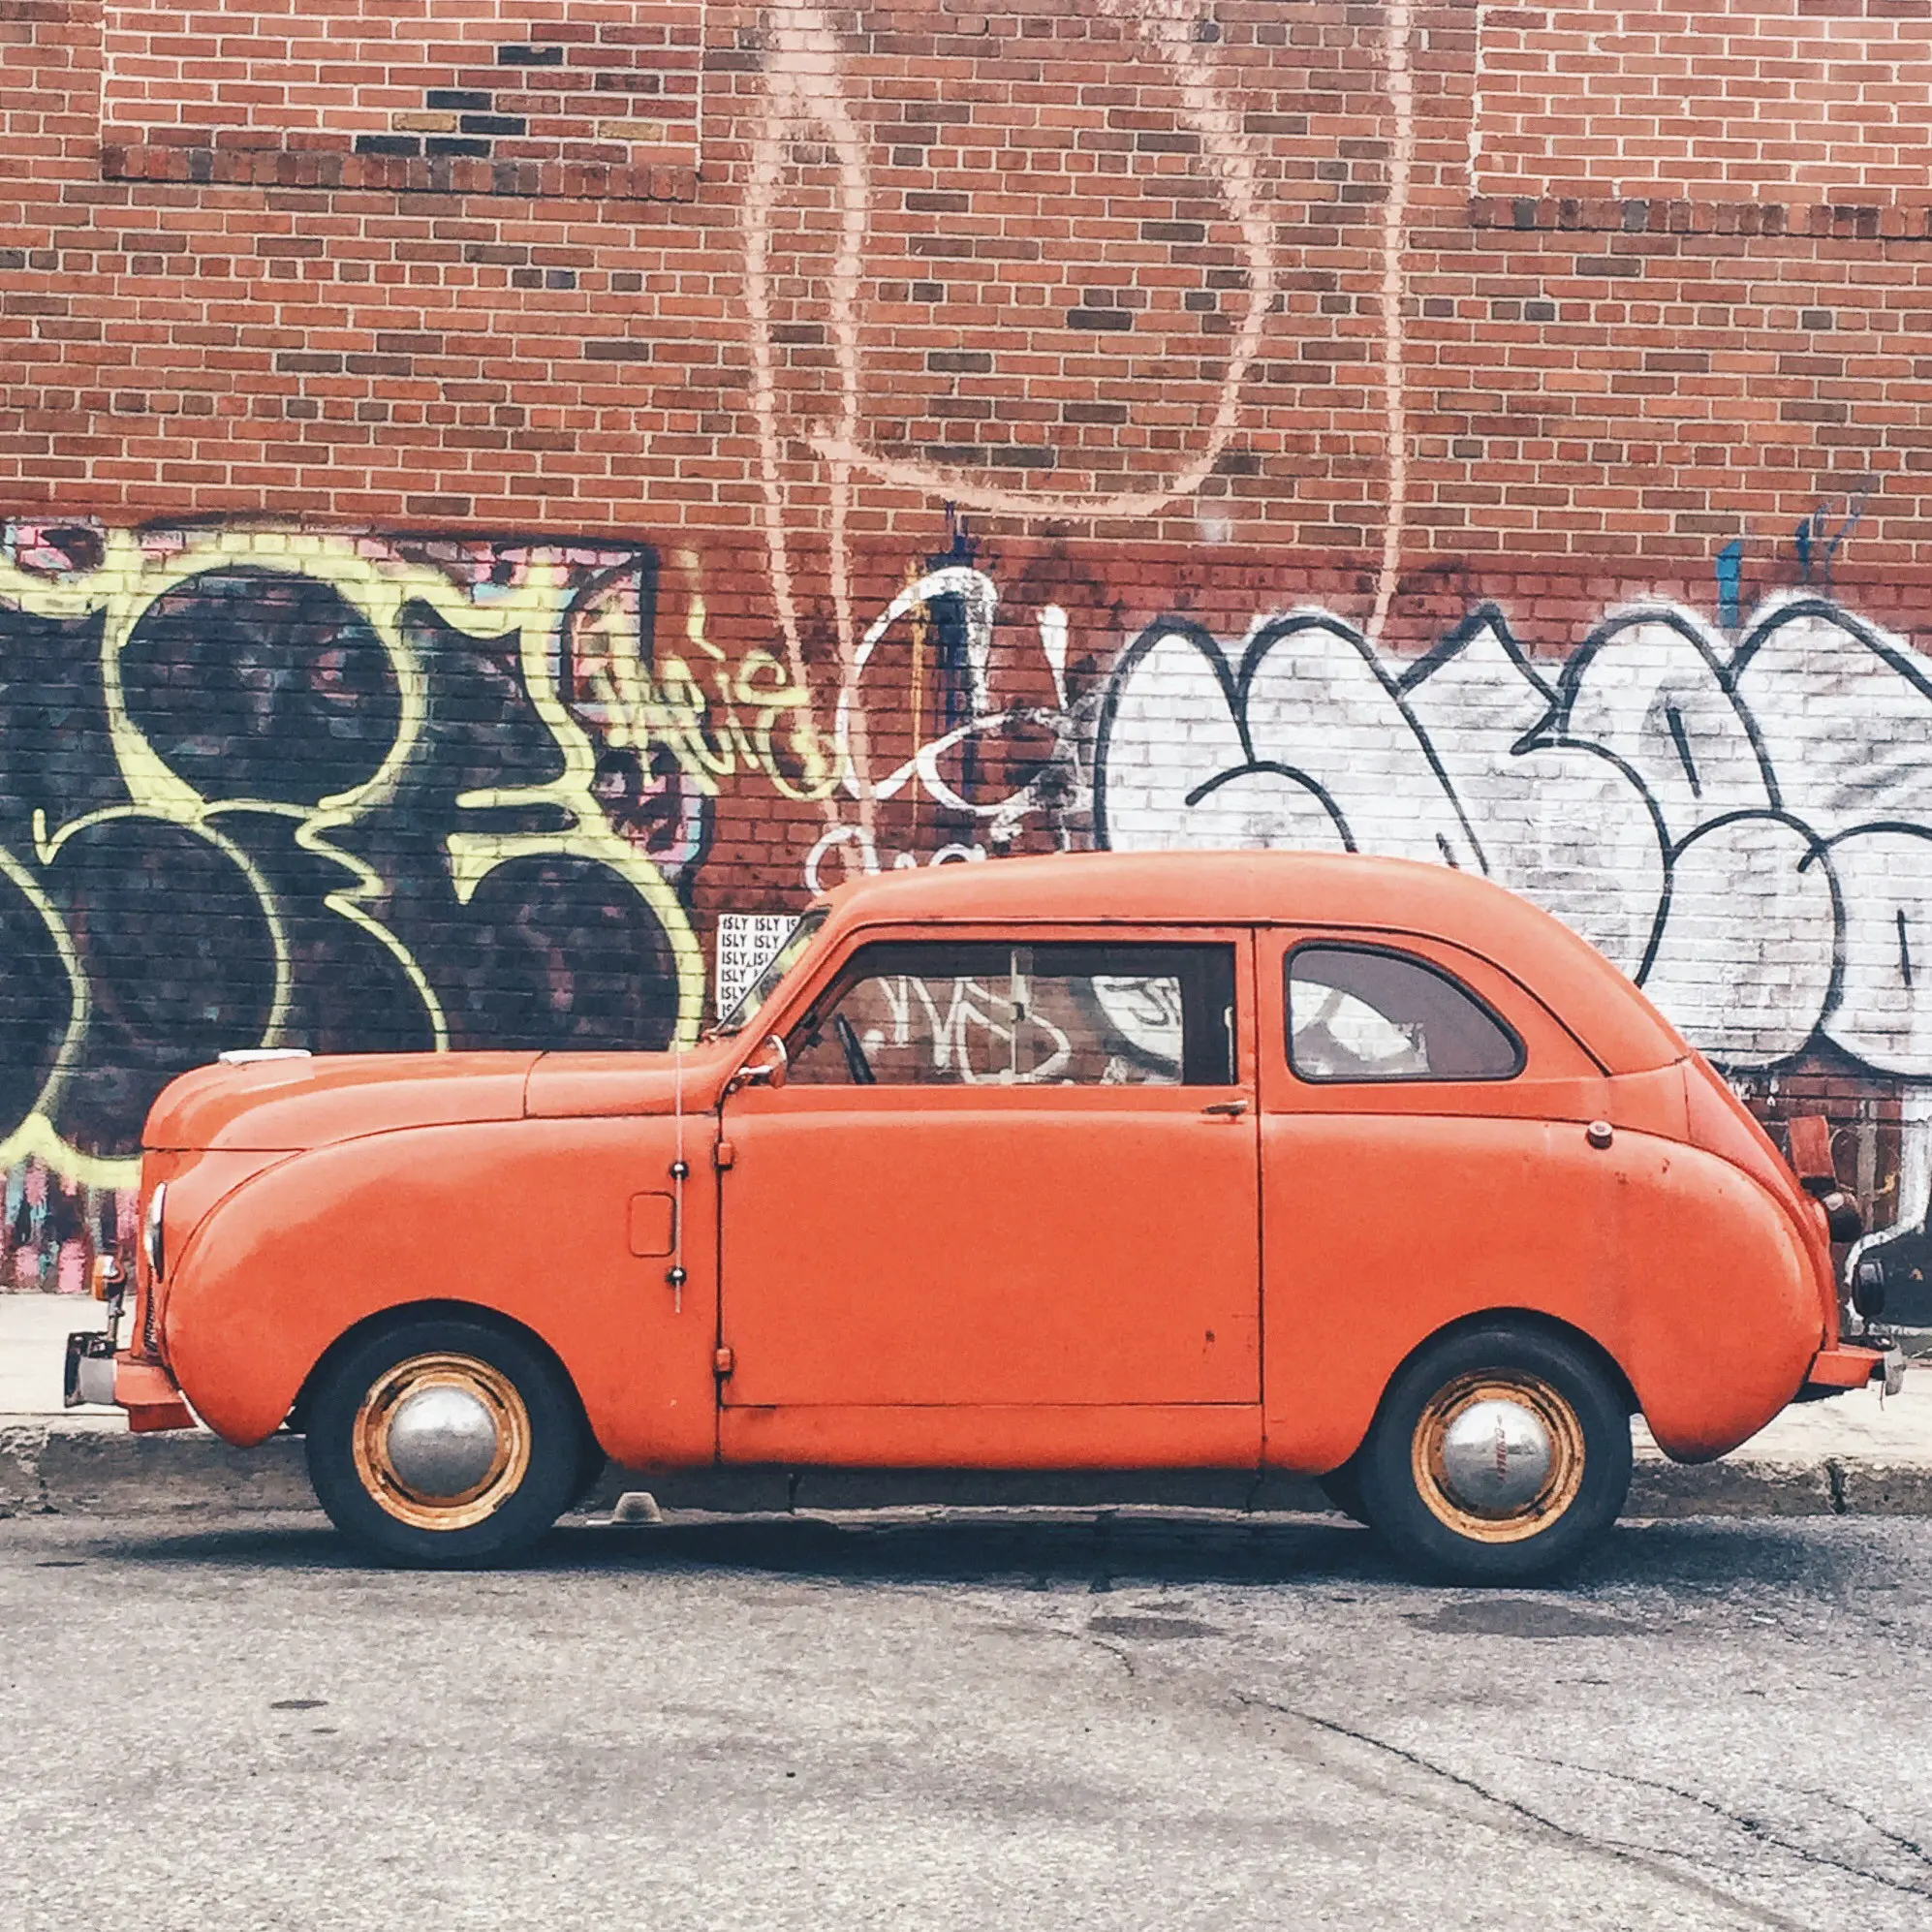 | 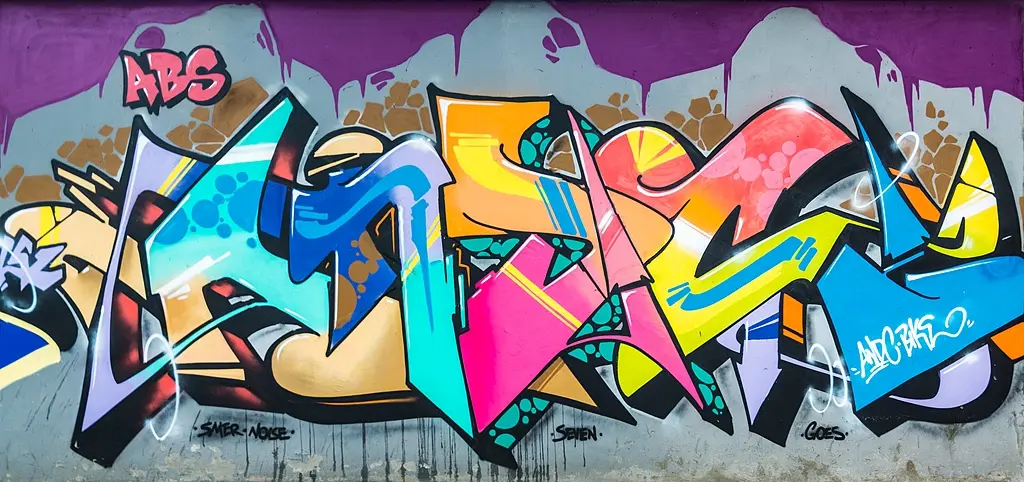 | 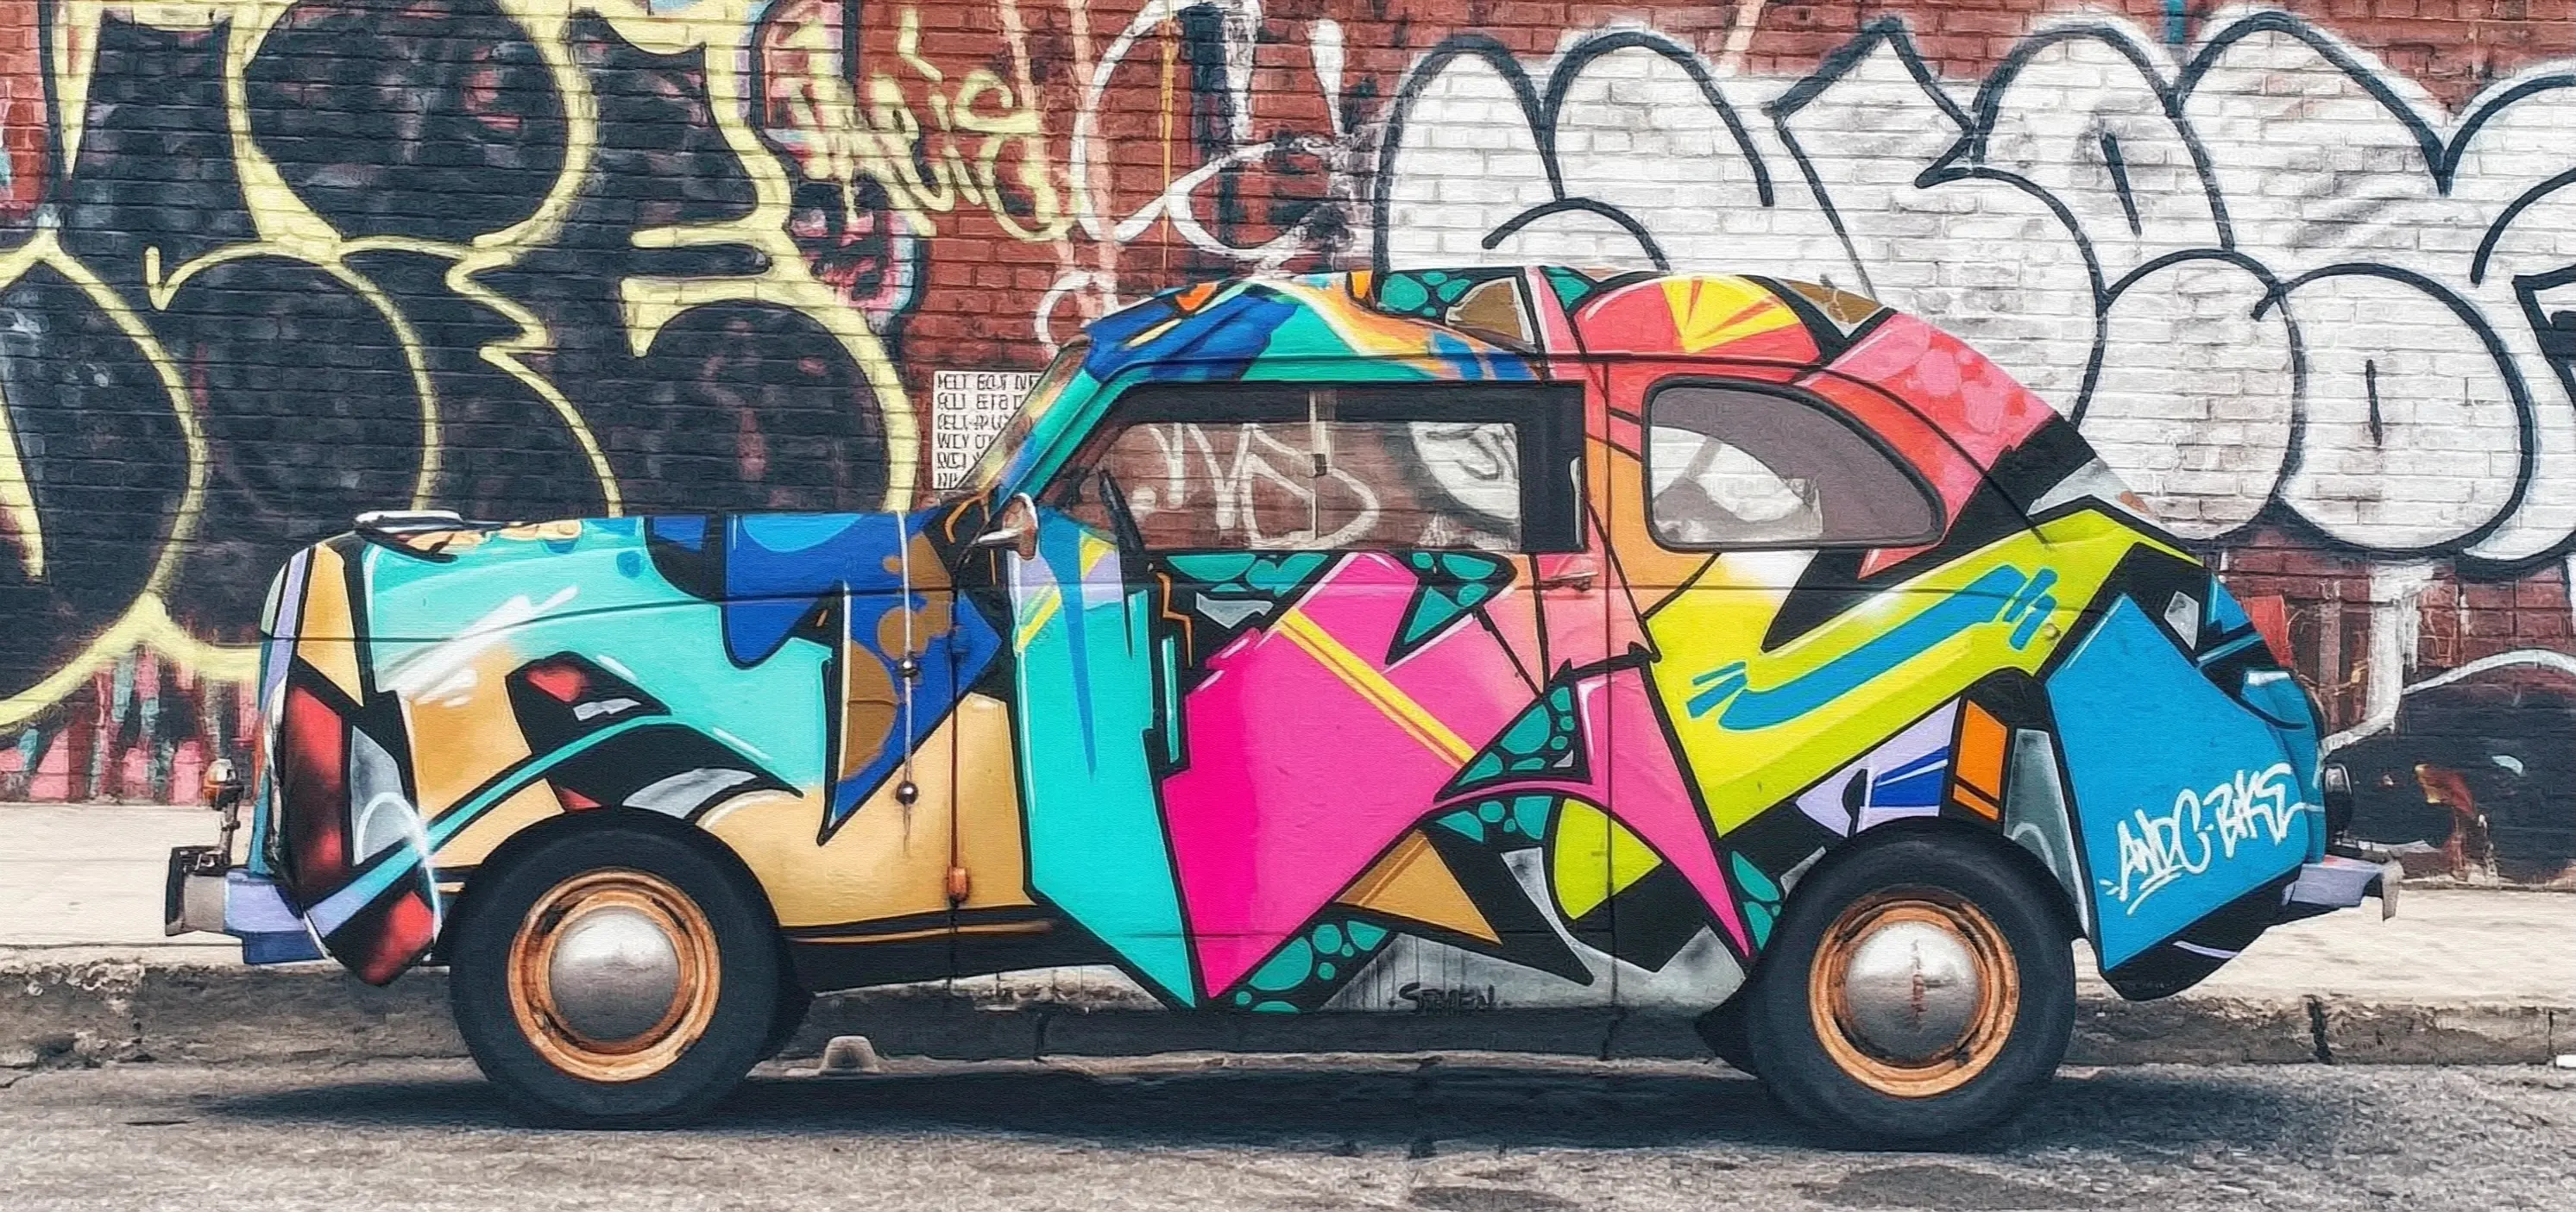 |
- 同步调用
- 异步调用
请确保 DashScope Python SDK 版本不低于
1.25.15,DashScope Java SDK 版本不低于 2.22.13。点击查看wan2.5-i2i-preview调用示例
点击查看wan2.5-i2i-preview调用示例
wan2.5-i2i-preview使用不同的API端点和参数传入方式,其调用示例如下:
同步调用(wan2.5)
请确保 DashScope Python SDK 版本不低于
1.25.2,DashScope Java SDK 版本不低于 2.22.2。异步调用(wan2.5)
请确保 DashScope Python SDK 版本不低于
1.25.2,DashScope Java SDK 版本不低于 2.22.2。模型选型
-
wan2.7-image-pro、wan2.7-image(推荐):适合对编辑精度要求高、或需要生成多张内容连贯图像的场景。
- 精准局部编辑:框选图中指定区域,对该区域的对象进行移动、替换或添加新元素,适用于电商修图、设计稿调整。
- 多格连续图生成:一次输出多张风格统一的图像,适用于漫画分镜、产品系列图、故事连环图。
- wan2.6-image:适合图文混排或带多张参考图的风格化编辑场景,支持在生成图像时生成对应文字内容,最多支持 4 张参考图输入。
- wan2.5-i2i-preview:适合简单的图像编辑和多图融合。
效果展示
图生组图
| 输入图像 | 输出图像 |
|---|---|
 |  |
 |  |
交互式编辑
| 输入图像 | 输出图像 |
|---|---|
 |  |
多图融合
| 输入图像 | 输出图像 |
|---|---|
 |  |
 |  |
主体特征保持
| 输入图像 | 输出图像 |
|---|---|
 |  |
检测和分割
| 输入图像 | 输出图像 |
|---|---|
 |  |
 |  |
提取元素
| 输入图像 | 输出图像 |
|---|---|
 |  |
文本编辑
| 输入图像 | 输出图像 |
|---|---|
 |  |
 |  |
 |  |
镜头与视角编辑
| 输入图像 | 输出图像 |
|---|---|
 |  |
 |  |
输入说明
输入图像规格
| 规格 | wan2.7-image-pro、wan2.7-image | wan2.6-image | wan2.5-i2i-preview |
|---|---|---|---|
| 输入图像数量 | 0~9 张(0张对应文生图模式) | 图像编辑 1~4 张 / 图文混排 0~1 张 | 1~3 张 |
| 图片格式 | JPEG、JPG、PNG(不支持透明通道)、BMP、WEBP | JPEG、JPG、PNG(不支持透明通道)、BMP、WEBP | JPEG、JPG、PNG(不支持透明通道)、BMP、WEBP |
| 图片宽高范围 | [240, 8000] 像素 | [240, 8000] 像素 | [384, 5000] 像素 |
| 文件大小 | ≤ 20MB | ≤ 10MB | ≤ 10MB |
| 宽高比 | [1:8, 8:1] | 不限 | [1:4, 4:1] |
图像输入顺序
多图输入时,按照数组中的顺序定义图像顺序。因此,提示词引用的图像编号需要与图像数组中的顺序一一对应,例如:数组中的第一张图片为"图1",第二张为"图2",或者使用标记形式如"[图1]"、"[图2]"。
| 输入图像1 | 输入图像2 | 输出图像 | |
|---|---|---|---|
 |  |  |  |
图像传入方式
支持通过以下方式传入图像:
方式一:公网URL
方式一:公网URL
方式二:Base64编码
方式二:Base64编码
方式三:本地文件路径(仅限SDK)
方式三:本地文件路径(仅限SDK)
关键能力
1. 指令遵循(提示词)
参数:messages.content.text或input.prompt(必选)、negative_prompt(可选)。
| 参数 | wan2.7-image-pro、wan2.7-image | wan2.6-image | wan2.5-i2i-preview |
|---|---|---|---|
| text | 必选,最多5000字符 | 必选,最多2000字符 | 不支持 |
| prompt | 不支持 | 不支持 | 必选,最多2000字符 |
| negative_prompt | 不支持 | 支持,最多500字符 | 支持,最多500字符 |
2. 开启prompt智能改写
参数:parameters.prompt_extend(bool,默认为 true)。
此功能可自动扩展和优化较短的Prompt,提升输出图像效果。开启此功能会增加额外耗时。
| 参数 | wan2.7-image-pro、wan2.7-image | wan2.6-image | wan2.5-i2i-preview |
|---|---|---|---|
| prompt_extend | 不支持 | 支持(仅图像编辑模式) | 支持 |
3. 设置输出图像分辨率
参数:parameters.size(string),格式为"宽*高"。
| 参数 | wan2.7-image-pro、wan2.7-image | wan2.6-image | wan2.5-i2i-preview |
|---|---|---|---|
| size | 方式一:指定输出图片的分辨率(推荐) 编辑模式(传入至少一张图片),可选的输出分辨率档位:1K、2K(默认)。1K:输出总像素接近 1024*1024,宽高比与最后一张输入图像一致。2K:输出总像素接近 2048*2048,宽高比与最后一张输入图像一致。方式二:指定生成图像的宽高像素值 总像素在 [768*768, 2048*2048] 之间,宽高比范围为 [1:8, 8:1]。仅文生图场景的 wan2.7-image-pro 支持 4K 分辨率。 | 方式一:参考输入图比例(推荐) 编辑模式(enable_interleave=false),可选的输出分辨率档位:1K(默认)、2K。1K:输出总像素接近 1280*1280,宽高比与最后一张输入图像一致。2K:输出总像素接近 2048*2048,宽高比与最后一张输入图像一致。方式二:指定生成图像的宽高像素值 总像素在 [768*768, 2048*2048] 之间,宽高比范围为 [1:4, 4:1]。实际输出图像的像素值为接近指定值的16的倍数。 | 仅支持指定生成图像的宽高像素值 总像素在 [768*768, 1280*1280] 之间,宽高比范围为 [1:4, 4:1]。若未指定size,系统将默认生成总像素为 1280*1280 的图像,宽高比与最后一张输入图像一致。 |
4. 交互式精准编辑
通过 parameters.bbox_list 参数框选图中需要编辑的物品或位置,实现更准确的编辑效果。仅 wan2.7-image-pro、wan2.7-image 支持此功能。
- 对应关系:列表长度必须与输入图片数量一致。若某张图片无需编辑,需要在对应位置传入空列表
[]。 - 坐标格式:
[x1, y1, x2, y2](左上角 x, 左上角 y, 右下角 x, 右下角 y),使用原图绝对像素坐标,左上角对应(0,0),x 轴向右,y 轴向下。 - 数量限制:单张图片最多支持 2 个边界框。
如何确定编辑区域坐标
如何确定编辑区域坐标
方法一:OpenCV 画框在图片上拖拽鼠标画框,精准直观:方法二:视觉理解模型通过 qwen3.7-plus 自动识别目标区域坐标,用自然语言描述目标即可获取坐标:
计费与限流
- 模型免费额度和计费单价请参见模型列表与价格。
- 模型限流请参见限流。
-
计费说明:
- 按成功生成的图像张数计费。仅当接口返回
task_status为SUCCEEDED并成功生成图像后,才会计费。 - 模型调用失败或处理错误不产生任何费用,也不消耗免费额度。
- 按成功生成的图像张数计费。仅当接口返回
API参考
各模型使用不同的端点和请求结构:
| 模型 | 端点 |
|---|---|
wan2.7-image、wan2.7-image-pro、wan2.6-image | 同步接口:POST https://dashscope.aliyuncs.com/api/v1/services/aigc/multimodal-generation/generation异步接口: POST https://dashscope.aliyuncs.com/api/v1/services/aigc/image-generation/generation |
wan2.5-i2i-preview | 异步接口:POST https://dashscope.aliyuncs.com/api/v1/services/aigc/image2image/image-synthesis |
wan2.7/wan2.6:messages格式,在messages[].content数组中,通过image传入图像,通过text传入提示词。wan2.5:通过input.images数组传入图像,通过input.prompt传入提示词。

